Documenting code with JSDoc!
How often did you loose time trying to understand some piece of code - written so bad, that you were wonder whether it’s a product of not-experienced developer or someone intentionally wanted to break something with it? Wouldn’t it be great to have at least the description of its interface, know what input it consumes and what produces on output?
For all of you who actually were in such situation (and many others!), people thought about many ways of embedding in code (most often in the form of comments) special annotations, describing how the code (function, module, class etc.) actually works. One of such utilities is jsdoc, available for Java Script developers.
What is JSDoc?
jsdoc is a program, which can be installed by a Node package manager npm, using a simple command:
npm install jsdoc --save-dev
It can spot the special annotations in JS code, embedded as a part of comment (between characters: /** here text to be interpreted by jsdoc */). Such annotations describe e.g. the meaning and types of parameters in the function’s invokation, its value and type, use-cases, responsibility of a class etc. There are plenty of possibilities, what, at least partially, I want to show you in this post.
The jsdoc annotations are very useful for developers, who will work with our code in the future, they better and faster understand the author’s intentions, but that’s not the best thing! Such utility can be used to generate the documentation, based on them and the content inside. We can make it in a full automated way, receiving as a result a set of rendered HTML pages. What is the usage of this solution? Let’s imagine we work on a project, which is/will be used by many different developers/organisations. They will be interested in actually using our product, without going deep into implementation details. In such situation just sharing a ready documentation will be very helpful, and jsdoc can be used to generate it at any time.
Time for examples!
We’ll start with creating the code consisting of a single class definition (with few methods), a module and type. The code below is only exemplary, you shouldn’t reason about the author’s view on IT world based on it ;) It declares a simple “Manager” class, which instances are able to efficiently manage projects in a company:
class Manager {
  _projects = [];
  _name;

  constructor(name, projects) { ... }
  reduceDeadline(project, fireMalcontents = false) { ... }
  cutBudgetOnClientRequest(project, reducedBudget) { ... }
  delayedProjects() { ... }
}
Of course in the case of such simple class we can guess how (more or less) the methods should behave. However, we don’t know whether they change the state of an object or not and, if yes, how. Additionally, the names here can by misleading or not strict (the word “manager” can be used in many different contexts for example). Also, in real life projects the code is often much more complex.
The second piece of code will be a simple module, exporting one function, removing the duplicates from the list of objects:
const unique = (list) =>
  list.filter((element, index) => list.indexOf(element) === index);

export {
  unique
}
Here we have even an easier example, but you can notice that knowing only the function name, we need to check its implementation in order to fully understand how it works, what is the parameter type and returned value.
Let’s add first JSDoc annotations!
We’ll start with the “Manager” class by adding the one-line annotation above its definition:
/** Class representing a standard manager in your company */Now we know what type of a “manager” the author had in mind writing this code. The next one will be class’s fields: _projects and _name:
/**
  * List of all projects which manager is responsible for
  * @private
  * @type {Project[]}
  */
_projects = [];

/**
  * Name of the manager
  * @private
  */
_name;
First annotation which appears here is @private and it marks a private field in a class. It’s both the information for a developer using this class as well as the jsdoc program, generating the documentation, what I’ll write more later. The second one is @type. Thanks to it we know the type of _projects is an array of Project items. But what is a Project type? jsdoc also doesn’t have any idea, so it’s the next thing we need to define.
Defining custom types in jsdoc
/**
  * @typedef Project
  * @prop {string} name Name of the project
  * @prop {number} budget Current budget for the project
  * @prop {Date} deadline Current deadline of the project
  */
@typedef annotation defines a custom type, how you can see it takes 1 argument, which is a name of the type. It’s often connected with @prop annotation, which defines the fields (together with their types!). The syntax for it is as follows:
@prop {field_type} field_name field_descriptionFrom this moment we can use the newly defined type in the following annotations, jsdoc will properly recognize them and generate a link to their definition in the documentation. Well done! However, the true power of this utility is visible when documenting functions and methods, so let’s move to the constructor of the Manager class.
Describing constructor and methods
/**
  * Creates a manager
  * @param {string} name Name of the manager
  * @param {Project[]} projects List of projects
  */
constructor(name, projects) { ... }
The first line of an annotation is always interpreted as a short description by default. We can also include it in multiple lines by using @description. The next are constructor’s parameters with their types, names and short descriptions, exactly the same as it’s when defining a type. This time we define the method’s parameters, not a type’s fields, so we use @param annotation. The following methods can be documented analogously:
/**
 * Reduce deadline on project when DEAR CLIENT requests it
 * @param {Project} project Project to reduce deadline
 * @param {boolean} fireMalcontents Flag indicating  whether to fire
 *  dissatisfied by this decision or not
 */
  reduceDeadline(project, fireMalcontents = false) { ... }

/**
 * Cut budget on project
 * @param {Project} project Project to cut budget
 * @param {number} reducedBudget New, reduced budget value
 */
  cutBudgetOnClientRequest(project, reducedBudget) { ... }

/**
 * Return all delayed projects under this  manager
 * @return {Project[]} List of delayed projects
 */
  delayedProjects() { ... }
Please note, that we can use both the types defined earlier by a user as well as the types embedded in Java Script (e.g. string, boolean, Date). The only new annotation there is a very useful @return, which defines the value returned from a function/method with its type and a short note.
It wasn’t complex! So now we can describe the “application/utils” module, exporting a simple function.
Documenting a module
/**
 * @module application/utils
 * @description
 * This is a module with some helper functions
 */
Such annotation (@module) defines a module in the application, I mean a code entity, exporting some values through the “export” instruction. The only function in this module is named “unique” and it removes the duplicates from the list:
/**
 * Removes duplicates from list
 * @function
 * @example
 * -> unique([1, 1, 2, 3, 2, 3, 4, 5, 5])
 * -> [1, 2, 3, 4, 5]
 * @param {any[]} list List of elements
 * @return {any[]} Unique  elements of original list
 */
We add here a simple note, mark it as a function (@function) and then show an example of usage. It’s particulary useful in the cases when it’s hard to shortly describe how function works. The @example annotation creates a fragment written with monospaced font inside documentation, so it’s ideal for examples of function’s invocations with different arguments and the returned values in these cases. Then we have a known @param and @return annotations. This time as a type we give an array of objects of any type - that’s because this function isn’t limited to filtering only strings or numbers. So we have any[] as a type.
Great! But how to actually generate the docs?
The easiest way of using jsdoc is by adding proper line in package.json file:
"scripts": {
  ...
  "jsdoc": "jsdoc -d docs/frontend -r src/",
  ...
}
From now we can generate documentation by running a simple command:
npm run jsdoc
in the console. The option -d (equivalent of –destination) specifies the directory in which the generated docs will be stored. Using option -r (equivalent of –recurse) means that all source files inside a given directory (and its subdirectories) will be used. Thanks to option -p (or –private) we can control the number of details in generated document - if specified, it will contain also symbols annotated as @private.
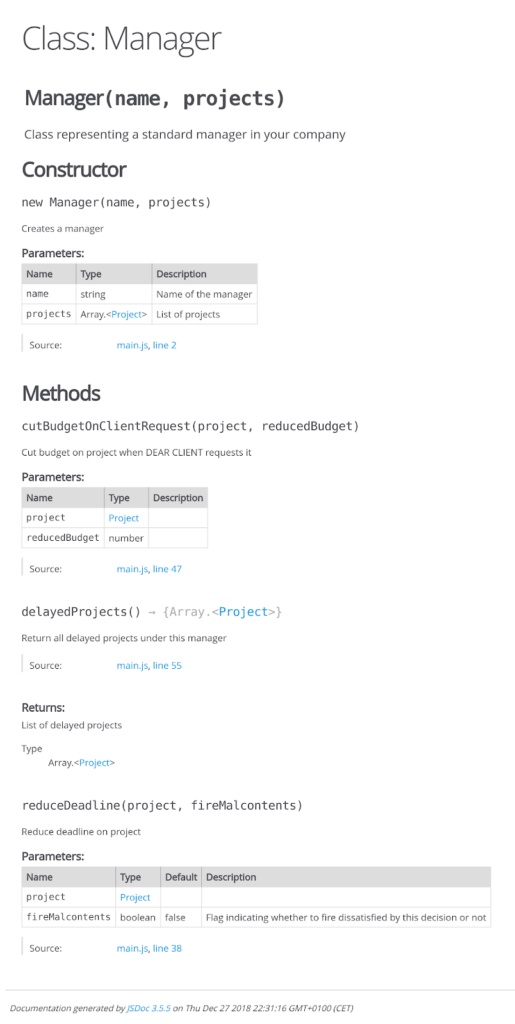
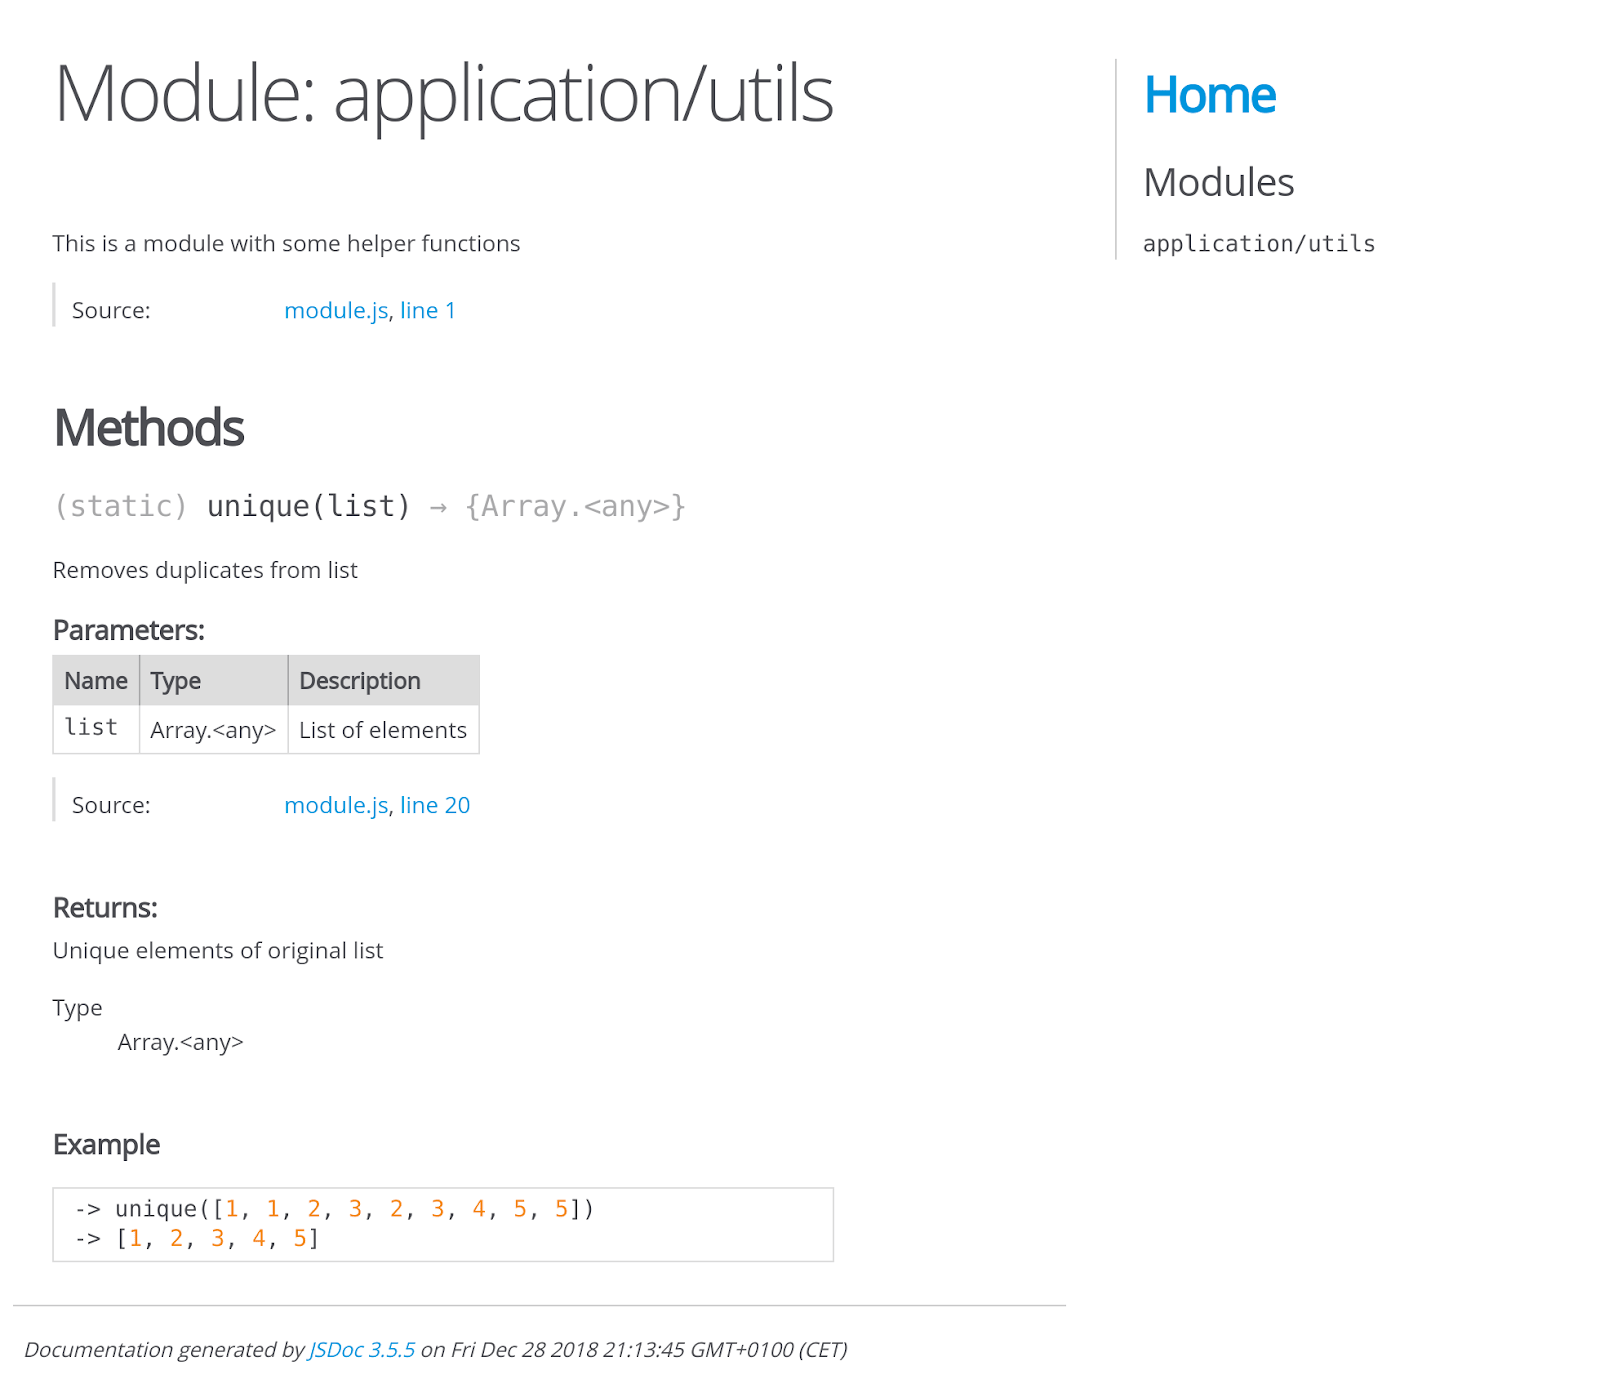
And this is how it looks the generated documentation for the examples from this post:
 “Manager” class
 “application/utils” module with the “unique” function
As we see, the document is clean and readable, it’s actually a direct mapping of information left by developer in annotations. Major area of the page lists documented functions/methods/types, together with their parameters and description. On the right side there is a navigation menu for simple moving between particular classes and modules. The documentation is also heavily linked inside, so you can always quickly go into interesting part.
Thank you for reading, I hope you’ve just learnt something new and useful :)
Sources: