Continuous integration with Jenkins
Continuous integration is a process which makes sure every new change introduced into the repository doesn’t break the functionality nor integrity of the app. It automates different steps ensuring that integrity, the most often are:
- running app’s tests (unit, integration, end-to-end etc.) with every new change pushed into code repository
- trying to build an application with proposed changes
- updating technical documentation, if exists
Today’s post describes how to start with continuous integration in your project by using a popular CI server, which is Jenkins.
Continuous integration based on a project from Bitbucket
We’ll start with creating new project on Jenkins, in which we’ll configure running applications tests automatically. We assume the code is hosted on Bitbucket.
Creating new Jenkins job
To create new job in Jenkins we need to click “New project” in the left panel:
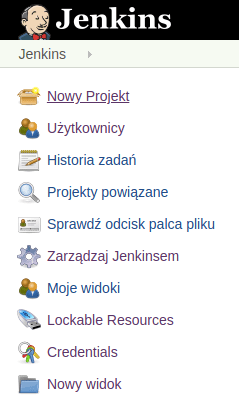 Left side panel of Jenkins
We’ll be moved to new screen, where we can enter the name (in this case “awesome-app-ci”). We choose “General project” and click “OK”:
 The view of creating new job in Jenkins
As a result, on the main page of Jenkins we’ll see our new job created:
 List of jobs with the newly created “awesome-app-ci”
Then we click the job’s name and move to the edit view. On the left side there are few options to manage it, among others the one allowing to define what it should actually do. So we click the gear icon “Configure”. We can configure few aspects of the job, let’s start with:
General settings
There we enter a simple description. The example is about a Bitbucket repository, so we keep “Github project” checkbox unselected. It’s worth to check “Discard Old Builds”. It means we won’t store the logs and other data about builds (so the runs of the job) older than X days or there won’t be more than Y old builds stored. This way we can save the disk space, not filling it with (probably) not important data about builds from the past. An interesting option in this section is also “This project is parameterized”, which is useful in e.g. jobs deploying changes to server. In such cases user often want to choose which commit, tag or branch should be deployed before the job starts. Here we keep this option not selected.
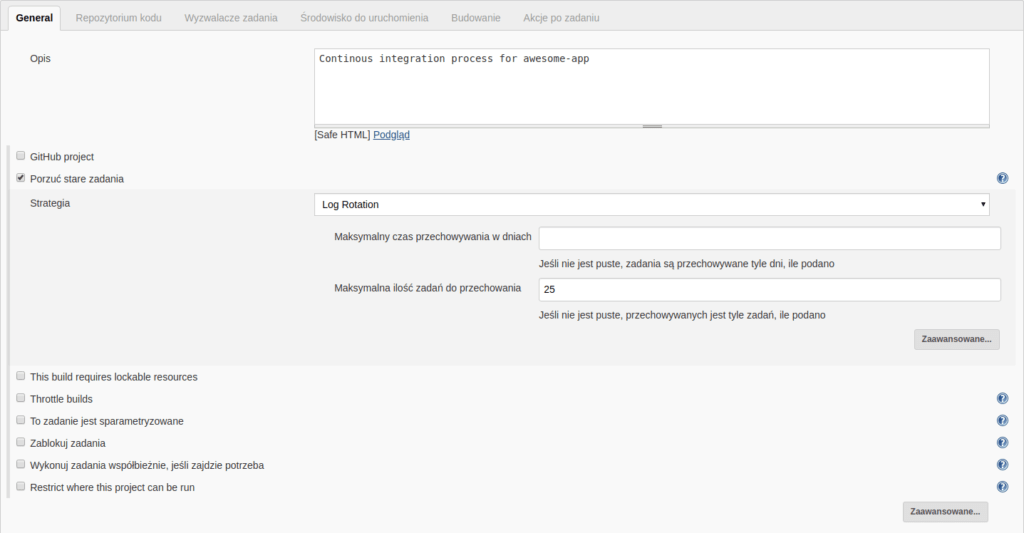 ‘General settings’ section view
Pointing the code repository
The next step is to enter the URL of the repository we want to integrate. In this example we use “repositoryOwner” and “repositoryName” variables, which comes from the next section. So as a result, we get a URL synchronized with the values we enter for “repositoryOwner” and “repositoryName” variables. It’s also required to add the key pair (“Credentials”), which we need to create and name earlier. One of the keys (private) is visible and stored only on Jenkins, the second one (public) has to be added as a “Read access key” in proper service (in this case Bitbucket). As a “Branch specifier” we enter a */${sourceBranch} value. The sourceBranch variable (the branch we want to start Jenkins job on) is given to us automatically by the Bitbucket Pull Request Builder plugin, which we use in this setup.
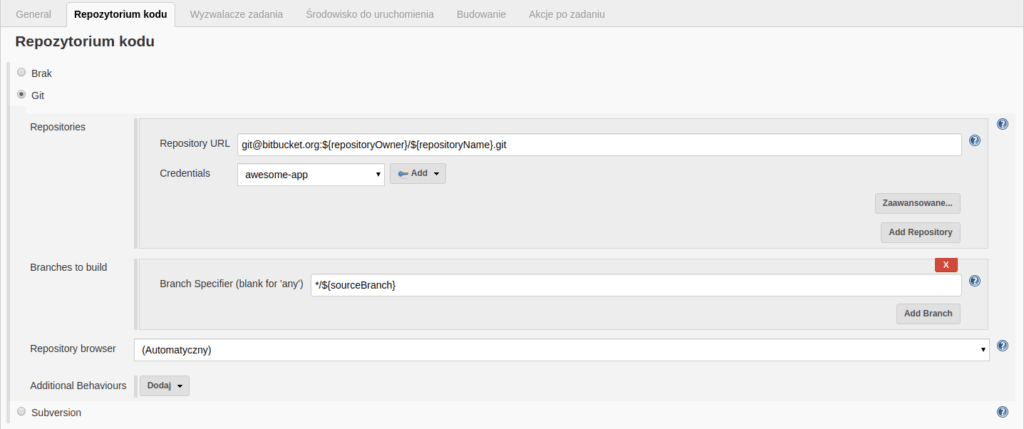 The view of the “Code repository” section in job configuration
Bitbucket access and build settings
In this section we have the most information to complete. We start with selecting “Bitbucket Pull Requests Builder” option – as I wrote earlier, we want to use this plugin. In the “Cron” field we enter "* * * * *" value, which means, Jenkins will check out repo every minute whether there are some changes requiring the job to be run. The next important fields are “Bitbucket BasicAuth Username” and “Bitbucket BasicAuth Password”, so the name and password of the Bitbucket’s user. It’s best to create a new, dedicated user to trigger the job (in this case with the jenkins@awesome-company.com email) and to give him access to the repo. In the “RepositoryOwner” field we enter the organization/user owning the repo. “RepositoryName” requires us to input the repository’s name. In the “CI Identifier” field we enter an unique name among all the Jenkin’s jobs regarding that repository - the best is to add a short description what Jenkins does in this job for this repository.
An interesting option here is to set “Comment phrase to trigger build”. It makes possible to trigger the Jenkins job manually by simply entering a proper comment in pull request. For example, it’s sufficient to gladly ask Jenkins to run the tests again (so to add a “test this please” comment) in pull request, and Jenkins will trigger proper job automatically 🙂
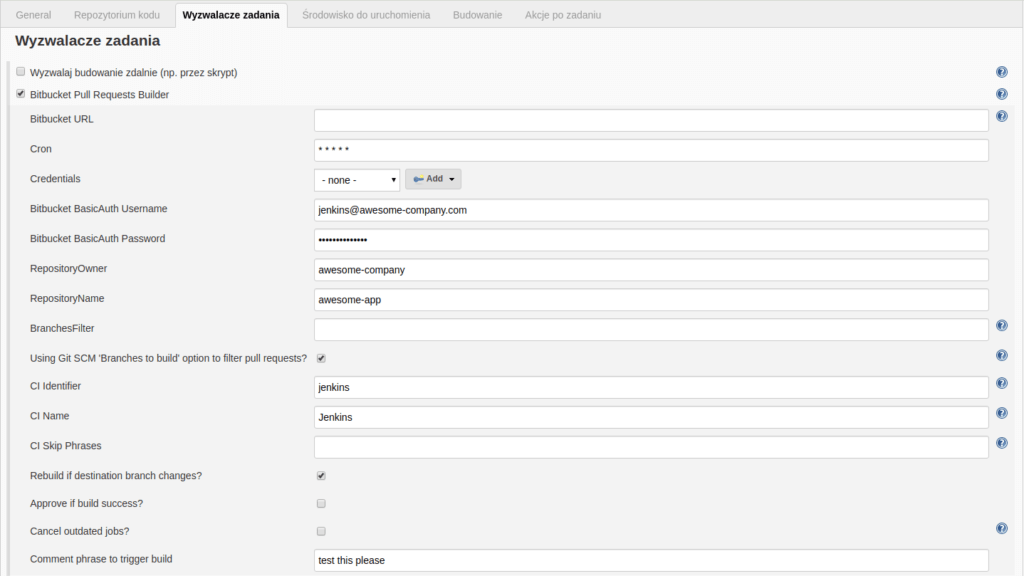 ‘Build triggers’ section view of job configuration
Build environment
Let’s notice the “Delete workspace before build starts” option here, so the possibility to automatically clean the workspace (the disk space where the job will execute) before it starts. (The workspace is in practice a dedicated folder on the server, where the job execution taskes place). It allows to start the job always from the exactly same, clean state. As a result, the jobs’ runs are more deterministic, because they don’t depend on local workspace state. On the other hand, we could click “Advanced” and control what exactly should be cleared, and what not. For example, like on the screenshot attached below, we can clean the workspace for each task, but without the node_modules directory. Such solution can make the builds faster, because they won’t need to download and install all project’s dependencies for each build with npm.
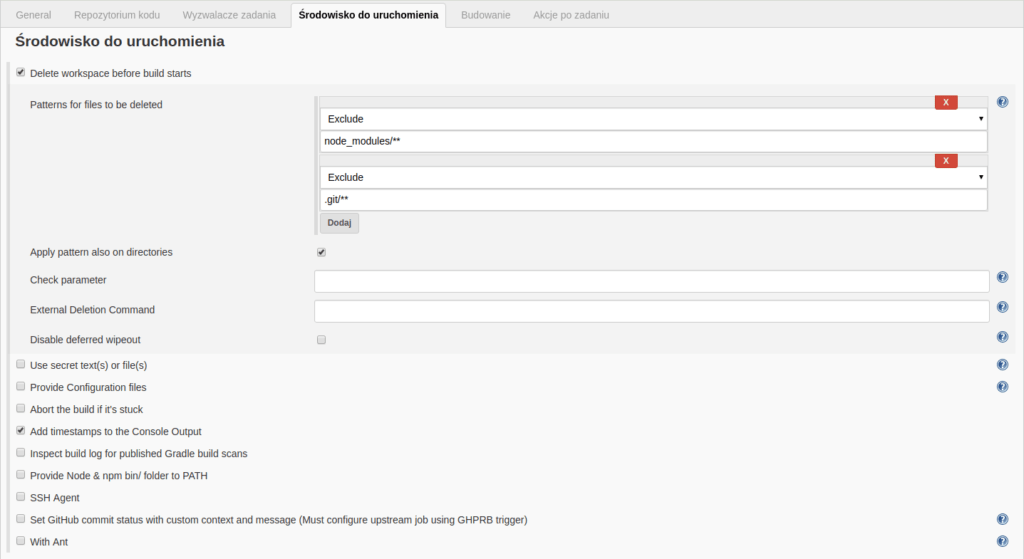 ‘Build environment’ section view of job configuration
Build
This section allows us to define proper steps for the job to execute (basically the script to run). For example, if our project is a standard Django app, then we probably want to:
- create a new, local, virtual Python environment (using e.g. virtualenv)
- activate that environment
- install all needed packages by pip (and possibly also those required by npm)
- run the tests with proper settings
And this is exactly what does this small script below:
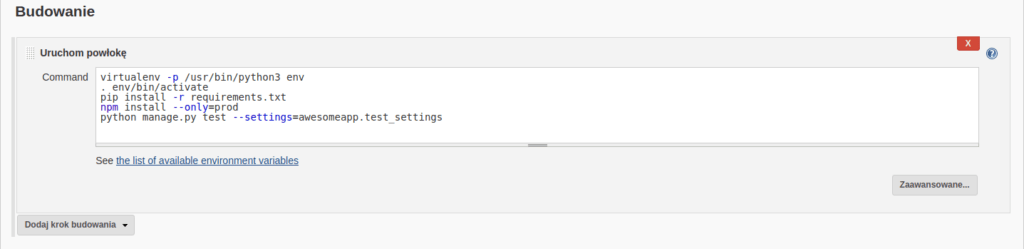 ‘Build’ section view of job configuration
Additionally, there is a “Post-build Actions” section, where we can define what Jenkins needs to do after finishing the job execution. A frequent example is sending an email to some person(s) in the case of job failure. There exists also an option to send a separate mail to the person who introduced the error.
Continuous integration for GitHub project
The configuration here is mostly analogous, but I’ll inform you about few places where it differs, so you won’t have problems also with GitHub projects 🙂
In order to “bind” the code repository from GitHub to Jenkins job, I propose to use GitHub Pull Request Builder plugin, similar to the one for Bitbucket. We need to start with plugin configuration. You can do it by entering the “Manage Jenkins” section (visible on the left side panel), and then the “Configure System”. In the section “GitHub Pull Request Builder” please find the “GitHub Server API URL” field and enter https://api.github.com value (or any proper one ;). Next, you should click “Add” near to the “Credentials” field and create the new credentials of type “User and password”. Here, enter the username and password to the GitHub account. A good practice is to create a new, dedicated GitHub account, only for Jenkins and adding it as a “Collaborator” to our repository. We don’t want to to use our private accounts, right?
Then, we can configure new Jenkins job – it’s analogous to the Bitbucket example, except few differences:
- in the “General” section we should choose “GitHub project” and enter URL for our GitHub project
- as a “Branch specifier” in the Source Code Management” we should use ${sha1} – as the plugin’s documentation suggests
- in the “Build Triggers” section choose “GitHub Pull Request Builder” and select the credentials created before
- (recommended) select an option “Use github hooks for build triggering”, so Jenkins will wait for an information from GitHub about the need to run the job (omitting this mean Jenkins will use polling to get such information from GitHub after every period of time, e.g. one minute)
 Entering URL of code repository in “General” section
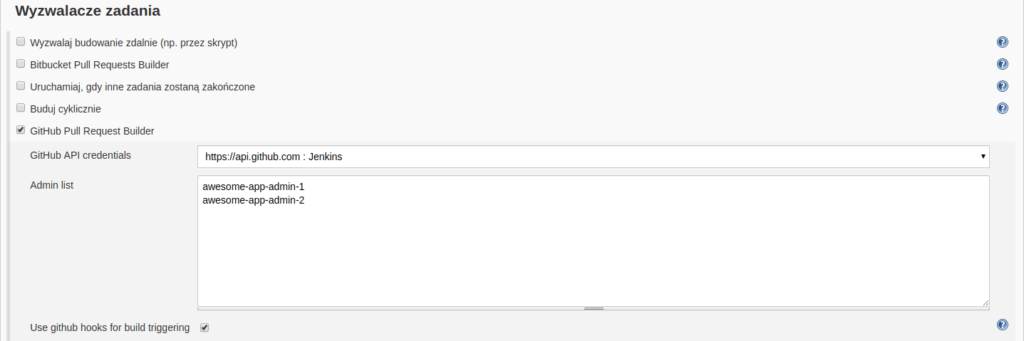 Configuration of ‘Github Pull Request Builder’ plugin in ‘Build Triggers’ section
The summary
As I’ve shown in this post, implementation of continuous integration doesn’t need to be hard and time-consuming, at least in such basic scope. Nevertheless, we need to remember it doesn’t fit well with every project. For example, when it doesn’t include tests, automatically generated documentation or cannot be built with every change, then implementing CI will be impossible or pointless. The conclusion is then: your product needs to be prepared for it. The process of implementing it, when you use one of available, dedicated solutions (which without a doubt Jenkins is) will be fairly straightforward 🙂
TL;DR
Jenkins makes it possible to “bind” the code repository from GitHub or Bitbucket. Every pull request can be tracked by it, triggering the job(s) specified by our scripts when any new change will appear. It can run the test suite for our application, try to build it, generate an updated documention etc.