App releases management with Git
The important element of our developer’s work, almost indepedent from the project, is deploying the following versions of the application to some testing/staging/production server. If we’re lucky, then any task will just go into staging after passing a testing phase on the client’s side, and finally, on client’s request, into production. In this “happy path” case, managing app releases is reduced to updating proper branches, which correspond to some servers, e.g. “develop”, “staging” or “production”.
Unfortunately, in my career as web developer I often met a situation when client changed its mind about the order of releasing the particular pieces of work. Day to day. Server to server. The set of tasks on testing was significantly different from the set of tasks on staging, which wasn’t the final version of what should be released to end user.
It’s exactly the point we’re starting from today. My proposition of managing app releases is basically about proper organization of branches in version control system. In this post it’ll be git.
App releases management in practice
This post is about some story. Story of a standard, developer’s task (which we’ll name “task 1”), from its creation until successful deployment to production server. We do some assumptions here:
- in every moment we want to have a possibility to deploy any task into testing server (and only that task)
- while preparing the release into staging server, we want to have a possibility to choose any set of tasks, tested before on testing server
- same as above reffers to preparing a release to production
Let’s start - creating a branch for “task 1”
We assume the main branch, reflecting the state of production server is the master branch. In this scenario we create a new branch for the task (let’s name it “task_1”), starting from the master branch:
    $ git checkout master
    $ git pull
    $ git checkout -b task_1
It’s important to update the state of local master branch, so you start with the same version of code as on production. The simplest way to do it is by running “git pull” on you local master branch.
The actual work on “task 1”
From this moment we can safely work on “task 1”. In the case there is a need to start some more important “task 2”, we can just repeat the procedure, creating new branch, starting again from the newest master.
By the way, please DO NOT TREAT GIT AS AN ARCHIVE UTILITY, supposed to be used “from time to time”, “after finishing the task” or “at the end of the day”. The commits should be made quite often, including small, consistent changes of the code with a clear and descriptive message added. It’s very helpful in the case of debugging regression errors. Small commits will make it easier for us to localize the exact version of the code which introduced the error, understanding the cause and removing it.
Deployment to testing server (optionally)
The workflow of managing app releases which I propose, assumes the existence of some testing server. On this server 1 task can be maximally deployed at once. It’s important, because we want the flexibility of choosing the tasks which will be deployed to preprod/staging server. Merging them all into one, shared branch would mean they become dependent from each other. The disadvantage is of course the fact that testing server can reflect at any time only the state of production + at most 1 additional task. On the other hand, my practice shows it’s not a big disadvantage, especially when you configure the deployment with some standard Continous Delivery tool. It can be done in e.g. Jenkins, some external service (Travis CI, Codeship, Circle CI) or your own scripts, making possible to deploy any change in few minutes. It’s important to not merge tasks into any base testing branch. Deploying the task to testing server should be done by just choosing a branch name (so e.g. “task_1” or “task_2”).
The only thing left is restricting an access to such servers, but I’ve already written few words about it in another post.
Preparing a deployment to preprod/staging
In order to prepare a deployment to preprod/staging we use a dedicated branch, in our example named rc_1. You can create more such release branches if there’s a need to do it (e.g. preparing 2 independent deployments). Personally, I call them rc_1, rc_2, rc_3 etc. They are useful in the case when we’ve already deployed to staging the tasks 1, 2 and 3 and then client wants only the task 1 and 3 on production. In this case we should create a new branch rc_2 (always from the latest version of base branch!) and merge to it only the tasks 1 and 3. More on this topic was written in the next parts of this post.
Preparing a deployment to staging server is basically about merging all needed branches into rc_* (in this phase we can choose any of them). And then the state of such release branch is deployed.
Testing on preprod/staging
Now, there is a time for testing new tasks on preprod/staging servers. In the ideal case, there’s a work for professional manual tester, a set of automated end-to-end tests (I can recommend the cypress utility for creating them) and, of course, the end client.
Client changed his mind! We should deploy another set of tasks…
Sometimes the priority of one of the task/some of them increases, so we should move them to production ASAP. For example, on staging there are available and tested tasks 1, 2 and 3. And on production there should be only 1 and 3. The valid solution in this case is to create new release branch, merging only task 1 and 3 to it, making another deploy to staging and testing them again.
Wait, why? They have been already tested! Yes, but there are also 2 causes why you should test them again:
-
You don’t want to manually pick commits (git cherry pick) of the tasks 1 and 3 (or whatever needs to be deployed) from release branch to another branch. Seriously, just don’t do it, this process is time-consuming and error prone.
-
(more important) The tasks 1 and 3 are potentially dependent from task 2, which now won’t be deployed alongside with them. So it’s possible that tasks 1, 2 and 3 works like a charm together, but when you remove 2 from this set, you’ll see errors. So the rule of thumb is to deploy into production only the state of code which has been already tested on staging. Exactly the same state, not only quite similar.
Deployment to production
The last phase of a task’s lifecycle is a deployment to production (often on the client’s request), and I repeat once more, only after testing the exact same version of the application on staging. We start with merging branch with the code tested on staging (e.g. rc_1) into the master branch. As a next step I propose tagging the version of code on master, so all the following releases will be ordered, numbered and properly described. In order to create a tag in git you need a command:
$ git tag -a v0.1 -m 'Minimal Valueable Product'
And then push it to remote repository by typing:
$ git push origin v0.1
Any utility you use to make a deployment should accept the tag as an input parameter. As a result, only these versions of code which were prepared to be deployed to production are actually used in this process.
Release management with the example
I’ll show you also an example of release management based on the case of 4 tasks, 2 deployments to staging and 2 to production. You can see this situation on the scheme below:
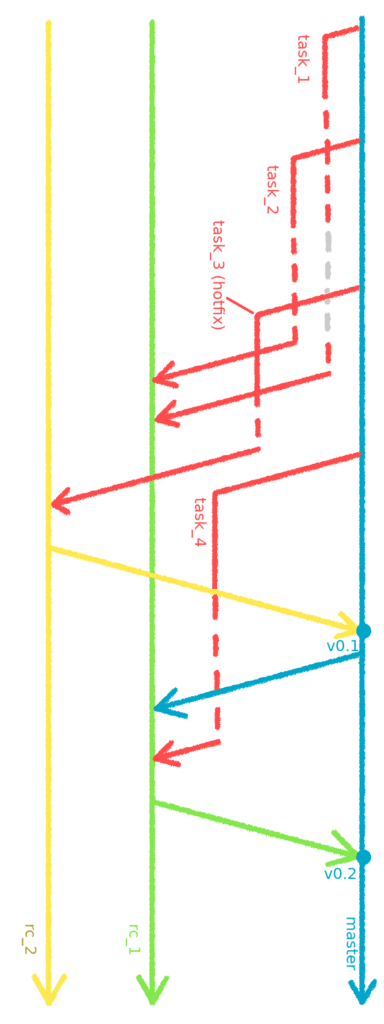 An example history of working on tasks and branch management
Branches rc_1 and rc_2 are for staging releases, master branch reflects the state of the code on production, branches assigned to particular tasks are named task_1, task_2, task_3 and task_4. The dashed red line means the testing period of a task on testing server. The dashed gray line means, that a task is ready, but at the moment isn’t deployed to testing server. As we remember, it should be there only 1 task at any moment.
Step by step analysis
Initially, the work on task_1 has begun (starting a new branch from master), the work was finished and its result deployed to testing server. In the meantime, developer has also started the work on next task (task_2). After finishing, task_2 was deployed to testing server (instead of task_1 - look at the dashed gray line). After that, the work on top priority task_3 (hotfix) started and both tasks 1 and 2 were merged into rc_1. Finishing work on task_3 meant that it had to be tested on testing server and then merged into another release branch, rc_2. Why it was done like this? This task needed to be moved to production ASAP, so without waiting for testing nor any possible fixes for task_1 and task_2. The deployment was done from rc_2 branch, task_3 was tested on staging and then rc_2 was merged into master. According to my proposition, the new tag v0.1 was created on master and the code was finally deployed to production.
Going further, the changes from master were included into rc_1 branch (with task_1 and task_2). It’s important to keep your branches up to date with master, because otherwise you may encounter some differences between how your app works before and after merging ;) After testing on staging, the rc_1 was merged into master, another new tag was created (v0.2) and the code was deployed to produciton one more time.
And… that’s all for today! I hope I clearly explained the proposed scheme of managing app releases. Maybe even one of you will use it in daily work? Or enhance the process in your project? Who knows!